(一).前言:
今天我们的项目继续更新,今天我们主要讲解消息总线EventBus的基本使用方法,后面一篇我们会从源码的角度稍微分析一下实现过程。
FastDev4Android框架项目地址:Https://github.com/jiangqqlmj/FastDev4Android
(二).简介:
以前我们做组件间的消息分发更新,一般会采用观察者模式,或者接口数据回调的相关方式。但是这样的做法虽然可以解决我们的问题,但是组件之间的耦合比较严重,而且代码也不易阅读和相关维护。为了解决这样的问题我们可以使用消息总线EventBus框架。
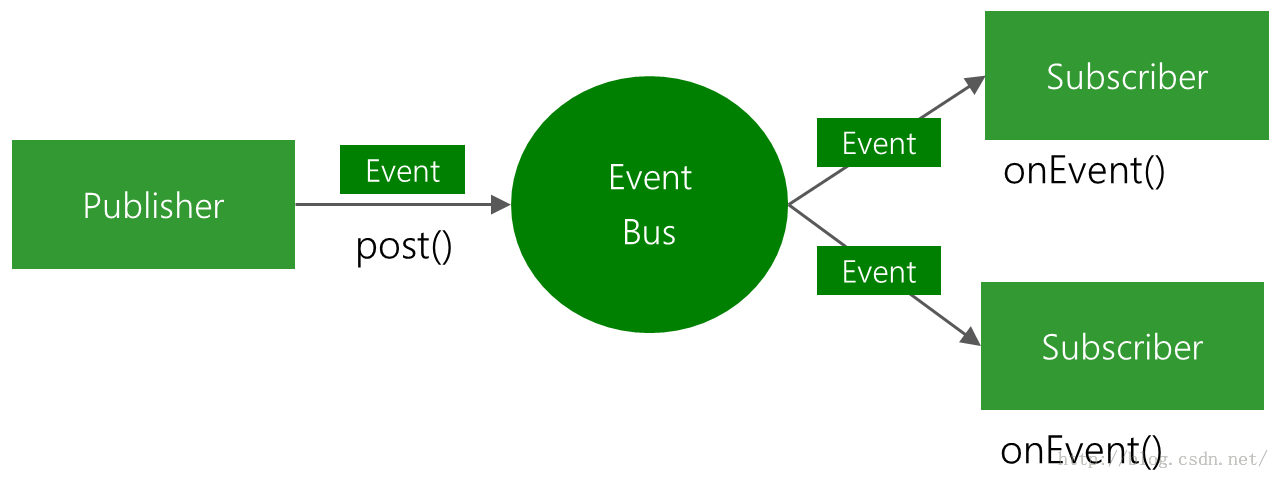
EventBus是一款针对Android优化的发布/订阅事件总线。主要功能是替代Intent,Handler,BroadCast在Fragment,Activity,Service,线程之间传递消息.优点是开销小,代码更优雅。以及将发送者和接收者解耦。EventBus开源站点地址:https://github.com/greenrobot/EventBus。
整个订阅和接受的架构如下图:

EventBus的特点如下:
- 简化组件间的消息通信
- 使得代码更加简洁
- 速度很快
- jar包非常小,不到50K
- 还有一些有点例如线程之间的通信,优先级等
(三).使用方式
3.1.AndroidStudio进行Gradle配置如下:
compile 'de.greenrobot:eventbus:2.4.0'
3.2.事件对象定义
publicclass MessageEvent { /* Additional fields if needed */ }
3.3.在接收页面进行注册
eventBus.register(this);
3.4.接收消息方法实现
public voidonEvent(AnyEventType event) {/* Do something */};
3.5.消息发送
eventBus.post(event);
OK上面是官方的使用说明,现在我们来具体使用一个实例来展示一下EventBus的基本使用。
(四).具体事例
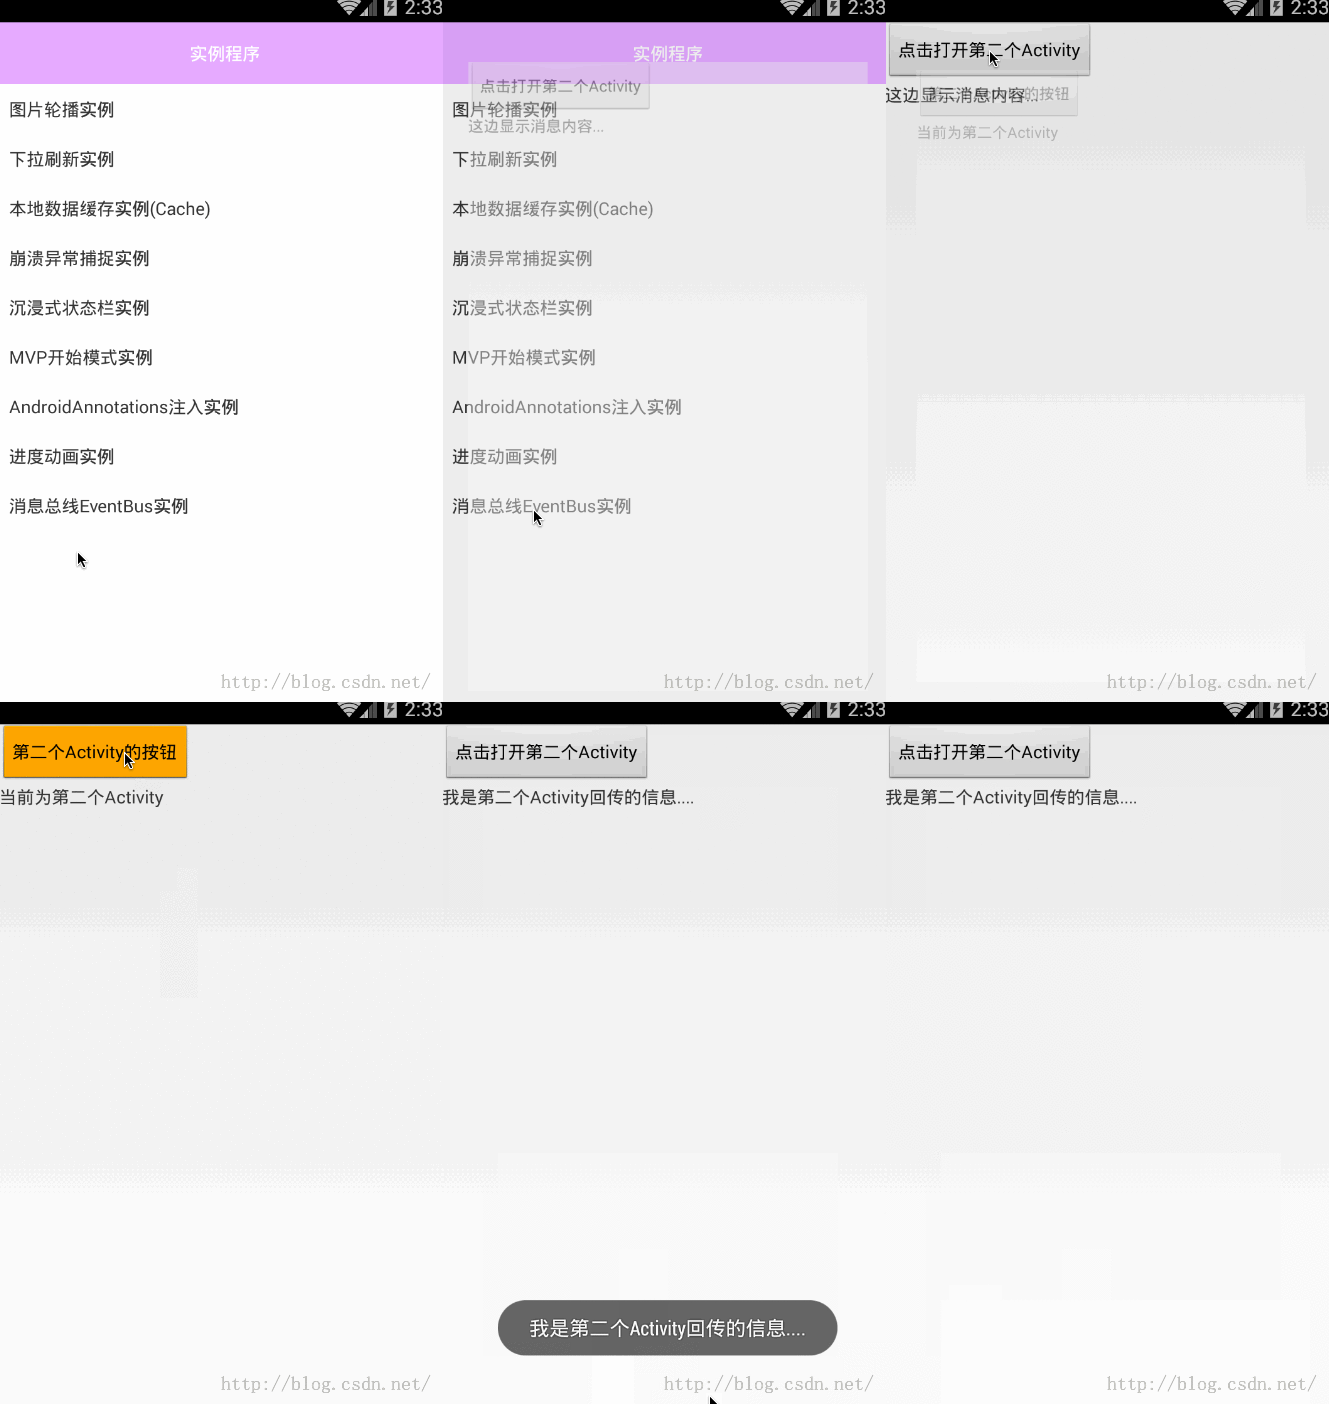
4.1.实现需求:在第一个Activity中有一个按钮和一个TextView,然后点击按钮打开第二个Activity,在第二个Activity中有一个按钮,点击按钮关闭当前第二个Activity,同时消息回调到第一个Activity中,在TextView中进行显示。

4.2.我们这边需要两个Activity布局
<?xmlversion="1.0" encoding="utf-8"?>
<LinearLayoutxmlns:android="http://schemas.android.com/apk/res/android"
    android:orientation="vertical"android:layout_width="match_parent"
   android:layout_height="match_parent">

    <Button
       android:layout_width="wrap_content"
       android:layout_height="wrap_content"
        android:text="点击打开第二个Activity"
        android:id="@+id/button_one"/>

    <TextView
       android:layout_width="wrap_content"
        android:layout_height="45dp"
        android:text="这边显示消息内容..."
       android:id="@+id/textView_one" />
</LinearLayout>
<?xmlversion="1.0" encoding="utf-8"?>
<LinearLayoutxmlns:android="http://schemas.android.com/apk/res/android"
    android:orientation="vertical"android:layout_width="match_parent"
   android:layout_height="match_parent">

    <Button
       android:layout_width="wrap_content"
       android:layout_height="wrap_content"
        android:text="第二个Activity的按钮"
        android:id="@+id/button_two"/>

    <TextView
       android:layout_width="wrap_content"
        android:layout_height="45dp"
        android:text="当前为第二个Activity"
       android:id="@+id/textView_two" />
</LinearLayout>
4.3.创建一个事件管理类:TestEventFirst.java
packagecom.chinaztt.fda.event;
/**
 * 当前类注释:EventBus测试 First事件类
 * 项目名:FastDev4Android
 * 包名:com.chinaztt.fda.event
 * 作者:江清清 on 15/11/3 14:25
 * 邮箱:jiangqqlmj@163.com
 * QQ: 781931404
 * 公司:江苏中天科技软件技术有限公司
 */
public classTestEventFirst {
     private String msg;

    public String getMsg() {
        return msg;
    }

    public void setMsg(String msg) {
        this.msg = msg;
    }

    public TestEventFirst(String msg){
         this.msg=msg;
     }
}
4.4:注册和取消注册
使用EventBus.getDefault().register(this);进行注册
使用EventBus.getDefault().unregister(this);进行取消注册
4.5.消息发送
使用 EventBus.getDefault().post(new TestEventFirst("我是第二个Activity回传的信息...."));进行消息发送
4.6.消息接收
在注册的Activity中进行重写onEventMainThread()方法来进行处理接收消息(除了这个方法以外,还有另外三个方法,具体我们会在下一篇文章中进行介绍)
/**
     * 收到消息 进行相关处理
     * @param event
     */
    public voidonEventMainThread(TestEventFirst event) {

        textView_one.setText(event.getMsg());
        showToastMsgShort(event.getMsg());
    }
其中方法中的参数TestEventFirst就是发送过来的消息类,具体发送的消息全部已经封装在里面了。我们只需要使用event对象进行获取处理即可。
4.7.完整第一个Activity和第二个Activity代码如下:
packagecom.chinaztt.fda.test;
importandroid.os.Bundle;
importandroid.view.View;
importandroid.widget.Button;
importandroid.widget.TextView;
importandroid.widget.Toast;

importcom.chinaztt.fda.event.TestEventFirst;
importcom.chinaztt.fda.ui.R;
importcom.chinaztt.fda.ui.base.BaseActivity;
importcom.chinaztt.fda.utils.Log;

importorg.androidannotations.annotations.Click;
importorg.androidannotations.annotations.EActivity;
importorg.androidannotations.annotations.ViewById;
importorg.w3c.DOM.Text;

importde.greenrobot.event.EventBus;

/**
 * 当前类注释:EventBus组件间数据通信实例
 * 项目名:FastDev4Android
 * 包名:com.chinaztt.fda.test
 * 作者:江清清 on 15/11/3 13:14
 * 邮箱:jiangqqlmj@163.com
 * QQ: 781931404
 * 公司:江苏中天科技软件技术有限公司
 */
@EActivity
public classEventBusTestActivity  extendsBaseActivity{
    Button button_one;
    TextView textView_one;

    @Override
    protected void onCreate(BundlesavedInstanceState) {
        super.onCreate(savedInstanceState);
       setContentView(R.layout.event_bus_test_layout);
        EventBus.getDefault().register(this);
       button_one=(Button)this.findViewById(R.id.button_one);
       textView_one=(TextView)this.findViewById(R.id.textView_one);
        button_one.setOnClickListener(newView.OnClickListener() {
            @Override
            public void onClick(View v) {
               openActivity(EventBusTestTwoActivity_.class);
            }
        });
    }
    /**
     * 收到消息 进行相关处理
     * @param event
     */
    public voidonEventMainThread(TestEventFirst event) {

        textView_one.setText(event.getMsg());
        showToastMsgShort(event.getMsg());
    }
        @Override
    protected void onDestroy() {
        super.onDestroy();
        EventBus.getDefault().unregister(this);
    }
}
packagecom.chinaztt.fda.test;

importandroid.os.Bundle;
importandroid.view.View;
importandroid.widget.Button;

importcom.chinaztt.fda.event.TestEventFirst;
importcom.chinaztt.fda.ui.R;
importcom.chinaztt.fda.ui.base.BaseActivity;

importorg.androidannotations.annotations.Click;
importorg.androidannotations.annotations.EActivity;
importorg.androidannotations.annotations.ViewById;

importde.greenrobot.event.EventBus;

/**
 * 当前类注释:
 * 项目名:FastDev4Android
 * 包名:com.chinaztt.fda.test
 * 作者:江清清 on 15/11/3 14:25
 * 邮箱:jiangqqlmj@163.com
 * QQ: 781931404
 * 公司:江苏中天科技软件技术有限公司
 */
@EActivity
public classEventBusTestTwoActivity extends BaseActivity {
    Button button_two;
    @Override
    protected void onCreate(BundlesavedInstanceState) {
        super.onCreate(savedInstanceState);
       setContentView(R.layout.event_bus_test_two_layout);
       button_two=(Button)this.findViewById(R.id.button_two);
        button_two.setOnClickListener(newView.OnClickListener() {
            @Override
            public void onClick(View v) {
               EventBus.getDefault().post(new TestEventFirst("我是第二个Activity回传的信息...."));
               EventBusTestTwoActivity.this.finish();
            }
        });
    }
}
到此我们的EventBus的基本使用已经讲完了,看一下上面的效果演示,具体深入详解以及其他的几个方法的介绍和相关源代码分析会在下一篇文章中进行讲解。
我们的项目已经配置集成了消息总线EventBus的例子.欢迎大家去Github站点进行clone或者下载浏览:https://github.com/jiangqqlmj/FastDev4Android 同时欢迎大家star和fork整个开源快速开发框架项目~